D&R Broadcast Mixing Consoles
D&R Broadcast Mixing Consoles

since 1972


WEBSTATION

User manual

Playout software

FAQ's

Other download links

Brochure
Videos

Main software
Main software


More software

Other download links
FAQ's (Frequently Asked Questions) menu

Software

On Air, fader start, GPO

USB

Troubleshooting & instructions

VoIP

Mic
FAQ's (Frequently Asked Questions)
Software
My firmware update isn't working?
Step 1
-
Be sure that the USB cable is connected.
-
Be sure that the original USB cable is used or a cable with a maximum length of 1,8 meter (6ft).
-
Don't use Extender cables or Hubs, connect it to a port directly on the mainboard.
-
When connecting the unit did you receive an error that there aren't enough end points or resources? Then there is probably an xHCI or different usb problem.
-
Did you download and select the right firmware?
Step 2
Is the unit in Bootloader mode?
-
This can be achieved by powering down the unit.
-
Press down the Conn(ect) button.
-
While holding down this button power up the unit.
-
Release the button after 5 seconds.
-
The unit will start with random leds on and will be in Bootloader mode.
Step 3
Step 4
NOTE: The firmware update tool requires JAVA 32-bits to be installed. Please download and install the latest version first.
NOTE: Some users still receive the error message: Firmware update failed! Make sure console is connected and in bootloader mode, they are probably missing the Microsoft Visual Studio drivers.
Step 5
Also take a look at this document: Firmware update "AtLibUsbDfu.dll not found"
Step 6
If the firmware update tool still doesn't work after these steps fill in the support contact form.
How do I open the Webstation control?

The Webstation control is running as a service and can be found with an icon on the taskbar of Windows.
When the Webstation is connected this icon will turn green.

When you click the icon with the right mouse button a pop up menu will appear.

Now press Settings.
The configuration tool will appear.
My software (Meters, Configuration manager, Playout software) doen't seem to connect with my mixer?
On some installations of Windows 10 or with some updates installed, the firewall seems to block some ports used by the Control software to communicate with the other software (Local and/or trough network). This makes it unable to configure or control the mixer.
Did you try to restart your computer to see if the ports can be reached after?
If this still doesn't work follow these steps!
This can be solved by changing some of these port numbers.
Sometimes with trying to find the right ones that are open.
Keep in mind that the Remote host should be the local host 127.0.0.1 or when sharing data with a secong pc the ip address of the computer where the mixer is connected to.
Step 1 (The Configuration manager)
Uncheck the Use defaults setting in the Control and Configuration manager.
For transmitting the configuration to the Mixer the Green port is used (Software to mixer).
The Red port is for reading the settings and Firmware version from the Mixer (Mixer to Software).
If one of these ports are blocked it isn’t possible to use the configuration tool.
Mostly when changing the Green port to a higher unused number like 19552 this will be fixed.
Keep in mind to stop the connection and re-start!
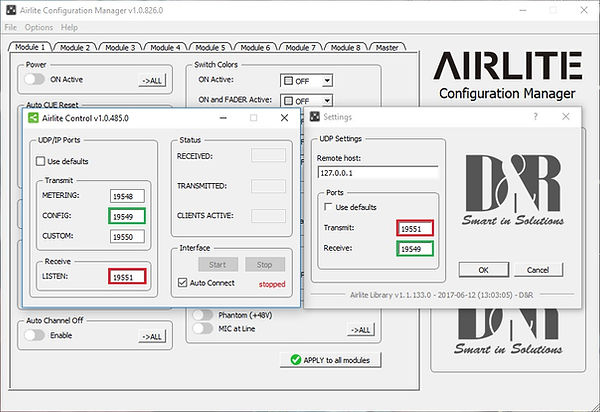
Step 2 (The meters)
In blue you’ll see the port that is used for transmitting the data to control the On switches with the software. (Software to Mixer).
In orange you’ll see the port that is used for transmitting the meter data to the meters. (Mixer to Software).
NOTE: Some PC’s with Windows 10 experience problems with meters losing the connection for a short time.
In Windows 7 this happens in a lower frequency and when you restart the PC it will run fine for a certain time.
It is caused by the usb handling of the operating system and is also visible in the Webstation Control software.
This can be solved by setting the power saving options of the usb to as less saving as possible or possibly playing with changing the port settings.

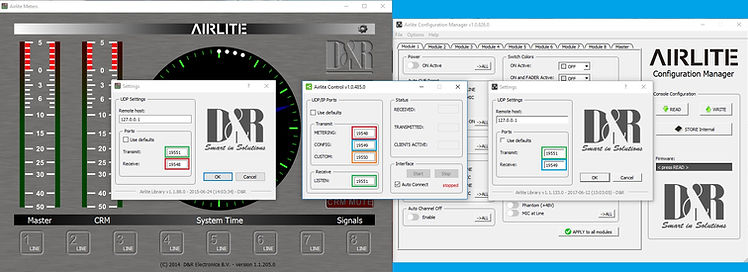
Step 3 (The Virtual Keyboard Mapper or Playout software)
For the control surface and fader start functions to control you’re playout software like in this example the Virtual Keyboard Mapper.
This will be the same in Aircast or other supported playout software.
The Green port is used to send the LED status data to the Webstation
(Software to Mixer).
The Red port is used for transmitting the Fader start or Button press status to the Software (Mixer to Software).
The Transmit ports (Red port) can only take one connection at a time!
If you want to use the transmit port for your playout software and for other software want to connect the virtual keyboard mapper as well you can also connect the VKM to the config port.
Keep in mind that the Virtual Keyboard mapper has to be closed to be able to work with the Configuration Manager.

Keep in mind that when you change the IP address or these ports you’ll have to change them in all the used software!
Step 4 (Overview and extra information)
How can I connect a second meter application on another PC?
To connect a second metering application on another PC:
1: the remote PC has to be connected to the same network as the host PC that is connected to the Webstation by USB.
2: open settings of the Webstation metering on the second PC
3: in the box “remote host” fill in the IP adres of the host PC
4: Check if the portsettings are the same as the metering on the host PC

How do I setup Aircast to work with my Webstation?
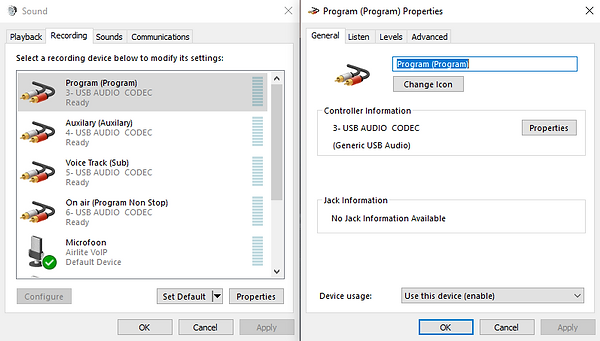
First you'll have to make it easier to identify your USB Audio Codecs.
Go to the sound settings of your Windows.

So for all the USB audio codecs you'll need to play the Test sounds to determine to which channel the USB Audio Codec is connected in your mixer.

You can rename them after double clicking on the USB Audio Codec.

The same has to be done for all the outputs to the computer.
This can be done with a Microphone connected to a Mic channel.
-
First test with only the ON activated and look at the small VU meter in the window, this one will be Program.
-
Then hold down the ON button till it starts blinking to activate the Voice Track bus.
-
Press the on button twice to return to the normal ON state.
-
Turn the Aux potentiometer (Full open) of the channel and the Aux Send (2 O'Clock) (Under the VU meter) to see where the Aux signal comes in.
-
The last one is the On Air
All visual settings have to be done in the configuration tool and the rest can be done at the Control panel in Aircast.

To use Aircast with 3 players you’ll have to go to the Aircast configuration tool and change Player count to the right amount of players.

The same can be done with the amount of Cartwall players, you’ll have to change the Width and Height.
A Width of 4 and a Height of 2 creates 8 players.

It is also possible to add Screen objects like the Aircheck recorder, LED clock, PFL player etc.

Also the Program recorder, shoutcast stream server are visible options so they'll have to be added in the Configuration tool.

My Meter software shows a distorted screen, what can be the problem?
This is caused by the Display scale setting in Windows.
If you set this to 100% the meter screen will be fixed.


Can we use a dual screen video setup from the automation PC so that the Webstation software screen shows up on a second screen?
Yes, this is possible. Running the Webstation Meters on any pc in your LAN network will work since control data is distributed over the LAN.
Is it possible the get the meter and control information for the Windows software, via the VoIP USB port?
The machine which is connected to the USB MAIN port needs to run the Webstation Control application to distribute the control signals over the LAN (UDP/IP).
In such a way any application on any machine can use the Webstation control signals.
This means controlling/configuring the Airlite or use Webstation Meters for displaying meter data.
Even controlling the Webstation from an external location, i.e. your home (when no one is in the studio) is possible through the Internet.
On my Apple Mac OSX the Control software loses connection.
There is an Appnap script added in the installation which prevents the Control software to go in sleep mode. Some users need to run this manually.
FAQ's (Frequently Asked Questions)
USB
What bit and sample rate settings are supported by the soundcards?
The soundcards in our mixers support 16 bit 32kHz, 16 bit 44kHz and 16 bit 48kHz.
My USB Channel or other USB hardware isn't recognized, what should I do?
Be sure that your USB cable is a High speed USB 2.0 cable and has a maximum length of 1,8 meters (5,9 ft).
It can help to replace the cable as a good connection is really important with the high bandwidth the mixer uses.

Connect your mixing console to a USB port directly at the mainboard of your computer. So no internal cables are used.

Do not connect the mixing console trough a USB Hub or a USB Extender.
This way the USB connection has enough bandwidth to use the USB Audio codecs and USB hardware for Meter software and controls.
Inside the mixing console is a USB Hub that can handle the bandwidth this hardware needs.

When connecting the USB, I receive a message that the maxmimum services or end points are reached. How can I fix this?
For customers that receive a operating system message that the maximum end points or services are reached.
In some computers the manufacturers have chosen to use xHCI USB 3.0 ports.
This actually means that they combined the hardware of 2 USB 2.0 ports to reach higher speeds like the USB 3.0.
Combining these ports means that they need to share the amount of end ports that all USB equipment has.
When detecting the connected equipment the Operating System fills it's list of end points for that port until the maximum is reached.
With each Audio Codec needing multiple end points as well as the used hardware for controls and meter software, one mixing console can take all the end ports of a port.
This can be fixed by setting the USB ports to work as non xHCI ports (USB 2.0) in the BIOS configuration of your computer.
Be carefull to only change USB settings! Changing other settings can harm your computer!
D&R is not responsible for changing the wrong settings!
Another option is to use a USB2.0 card that is added to the computers ports.

My USB devices are mixed up:
Then you can try the following procedure.

* Disconnect your mixer from the PC. (USB Cable)
* Download USB Deview and run it. http://www.nirsoft.net/utils/usb_devices_view.html
* Remove all devices with the name “USB AUDIO CODEC” in it with the trashcan.
* Connect your D&R mixer with the standard USB cable.
* Now, wait patiently till Windows will recognize all the USB codes again.
* You should see all the usb audio codecs come up in usb deview again.
* If everything went fine all the four LEDs should be turned on. If not, something went wrong.
* Close USB Deview
Tips and tricks:
We also have some other usefull tricks to get your USB device to work.
Method 1:
Unplug the computer and mixer from the power supply and re plug.
The most recent computers aren't really going off when you shut down, the mainboard of the computer still have some power lines connected for the stand-by situation.
To reset the hardware completely it can help to disconnect the computer and mixer from the power outlet.

Method 2:
Update the Device driver.
Go to your control panel and then to device manager.
Find the Unknown Device and click on Properties, go to the driver tab and click Update Driver..

Method 3:
Disconnect all USB devices and restart your computer.
Disconnecting all USB devices and restarting and reconnecting will force the computer to re-detect USB devices.
Connecting on different ports can also force the computer to detect in a different sequence.
Method 4:
USB Root Hub power management.
In the Device Manager expand Universal Serial Bus Controllers, right click on USB Root Hub and Properties.

Go to the Power Management tab and uncheck Allow the computer to turn of this device to save power checkbox.
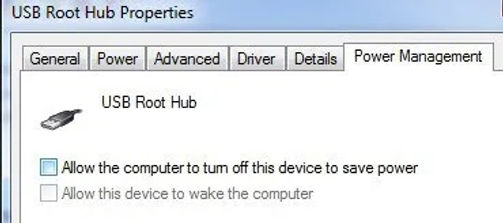
This setting has to be done for each root hub, on the computers mainboard are the USB connectors also connected to high speed USB hubs.
These USB hubs each have enough bandwidth to connect a D&R mixer.
Connecting a external Hub will devide the bandwidth over more ports and causing the bandwidth being to low.
Now restart your computer and reconnect the usb device, when the computer recognizes the USB device you can leave this settings as made.
When it still doesn't recognize the USB device reverse this setting for every hub and reboot.
Method 5:
Update Generic USB hub drivers.
In the Device Manager expand Universal Serial Bus Controllers, right click on USB Root Hub, choose Update Driver Software for each USB hub.
When you downloaded the drivers from the manufacturers website select Browse my computer for driver software.
Now browse to the folder where you downloaded the driver and install.

Method 6:
Uninstall USB Devices.
Be carefull with this option, when your Keyboard and Mouse are also connected by USB you can end up with an computer that can't be controlled.
In the Device Manager right click on each USB device and select Uninstall.
This can also be done with USB deview that is mentioned before.
USB deview will also show the USB devices that are not connected (hidden devices), you can also uninstall these.
Rebooting your computer will force to re-detect all the devices.

Method 7:
An other way to uninstall hidden devices.
To view hidden devices in the Device Manager you'll first have to enter the next commands in the Command Prompt.
set DEVMGR_SHOW_DETAILS=1
set DEVMGR_SHOW_NONPRESENT_DEVICES=1
start devmgmt.msc
When the Device Manager is started click View and Show hidden devices.
Expand Imaging Devices, Universal Serial Bus Controlles and Unknown Devices.
You can now Uninstall the greyed out devices.

Method 8:
How to disable USB selective suspend.
If you're having connectivity issues with USB peripherals on Windows 10, use these steps to disable the USB selective suspend feature.
Important: It's only recommended that you change this particular setting when you're experiencing problems with a USB device. Otherwise, you should leave the option enabled.
-Open Control Panel.
-Click on Hardware and Sound.
-Click on Power Options.
-Under “Preferred plan,” click the Change plan settings link for the plan you're currently using. (If you change the settings on the power plan that isn't active, this won't work.)

Click the Change advanced power settings link.

-Expand USB settings.
-Expand USB selective suspend setting.
-Select Disabled from the drop-down menu.

-Click Apply.
-Click OK.
If you're changing the settings on a laptop or tablet, you'll see two options: On Battery and Plugged in, so make sure to change those settings accordingly.
Once you complete these steps, Windows 10 will no longer power off USB devices connected to your computer, which can fix any problem you may have as a result of this feature.
Method 9:
Disable and Enable USB ports in the bios.
Restart your computer and enter it's BIOS, how to do this can be find in the manual of your computer.
Be carefull to only change USB settings! Changing other settings can harm your computer!
D&R is not responsible for changing the wrong settings!
Be sure that you have a Keyboard and or Mouse that is connected to a different port then the USB.
Now Disable the USB functionality and reboot your computer to let your Operating System detect the new setting.
When the system is booted restart your computer again and enter it's BIOS.
Now Enable the USB functionality and reboot your computer to let your Operating System detect the new setting.
Method 10:
Updating the BIOS.
KEEP IN MIND TO ONLY DO A BIOS UPDATE WHEN YOU KNOW THE RISK!
A FAILED BIOS UPDATE BY FOR EXAMPLE A POWER FAILURE CAN CAUSE THE COMPUTER TO NOT OPERATE!
In some situations a BIOS update can solve USB issues, these issues will be known by the manufacturers of your computer or mainboard.
Before doing an BIOS update get informed about if there are issues with your system and the possible fixes.
Will the Aircast via the USB port be able to play out on more than one fader?
Yes, the Webstation has three USB AUDIO CODECS available on the USB MAIN port. AIRCAST can play/receive three stereo streams to/from the Webstation.
What is the name of the codec the USB main uses?
The audio codecs are compatible with Windows, Mac and Linux. (TI PCM2900C).
For the module 3 to 5, if I'm using the stereo line input, are the On button or the fader still be able to send out HID signal over USB that can be programmed to do specific functions in my play-out system?
Yes, the module always sends control signals over USB, independent of your selected source.
What are the USB cable length limitations for USB 2 and 3?
Follow this link to a instruction .pdf:
FAQ's (Frequently Asked Questions)
VoIP
How to use the Voip channel in my mixer?
The Voip channel is actually a USB sound card with the advantage of having a Mix minus 1 (N-1) and Clean feed output.
The Mix minus 1 prevents the caller from hearing his self by sending back the Mix minus itself (1). The Clean feed output does the same by sending out the Mix minus itself for the Line input at that channel.
This can be used to connect an external Hybrid like the Hybrid 1, 2 or GSM Hybrid.
Our Voip channel are based on the CM119 USB sound card.
As all the Voip channels work the same way I will call them Voip channel in the instructions.
The Voip channel can be found (blue at the picture) at channel 6.


How can I configure the VOIPchannel with a VOIP application?
To use the Voip channel you'll need a Voip application on your computer and you need to setup the application to use the Voip channels “Microphone” input and “Loudspeaker” output.
Download Skype or another Voip application and install it on your PC.
When you connect the USB cable from your Voip channel to your PC, your operating system will see for example the “Airlite VOIP” audio codec and install it as a “Microphone” and “Loudspeaker”.
Since most Voip applications need a “Microphone” input to use for the incomming sound we used the CM119 chip.
Go to the settings of your Voip application and configure the commmunication Microphone and Headphone as the Voip channel source instead of the default Microphone and loudspeaker of the PC.
More information about how to configure your application can find the manual of the Voip application.
If this is done your Voip software recognizes the Voip channel as a headset and will work with all it's audio features.
It is possible to answer and make outgoing calls by opperating the computer but we also added a connect button and signalling feature.
Using the VOIP connect button:
To use the Connect button you'll need the D&R Voip connect application which can be found as a download above on this Wiki product website of the Webstation.
For the Webstation the firmware needs to be version 1.20 or higher to be able to use this application. You can find which firmware version is installed in the Webstation Configuration manager after you press Read.
Download and install this application.

When installed the application starts as a “Service” can be found at the taskbar.

When you right click on the icon and press Settings it will open the configuration of the D&R Voip connect application.

Select the model of the Mixing console that you are using.
This application works like a virtual keyboard mapper for most Voip applications.
So when you can “Answer” a call of your Voip application with a keyboard command combination and you can “Hang up” a call of your Voip application with a (different) keyboard command combination, you can configure these keyboard command combinations in the D&R Voip connect application.
Simple translate the keyboard command combinations to the ones in the pulldown setting boxes.
The connect LED setting works for the LED at the Connect switch and for the “Start” jack or “GPO” that is configured as Ring signalling.
When set to “Internal state” both will toggle between “Off” and “On with each press of the Connect button.
Now you are able to Answer and hangup a call with the Connect button.
Control the Connect LED when application fires a command prompt command
To control the connect LED on the voip channel you’ll have to select “Remote Controlled UDP (Phoner app)” can fire a command with your voip software.
“Voip Connect” -s incoming
“Voip Connect” -s connected
“Voip Connect” -s disconnected
or
c:\Program Files (x86)\D&R Voip Connect\Voip Connect.exe -s incoming
c:\Program Files (x86)\D&R Voip Connect\Voip Connect.exe -s connected
c:\Program Files (x86)\D&R Voip Connect\Voip Connect.exe -s disconnected
These instructions can be added in a batch file which can be started in a hidden situation.
The VOIP led of the button can be set to internal state of the switch, or controlled by the VOIP application (UDP).
Right mouseclick on the blue voipconnect icon that you can find in your hidden icons right under your screen to change settings.
How do I connect a Hybrid 1 to my mixer?
Follow the instructions in this .pdf document: How to connect a Hybrid1
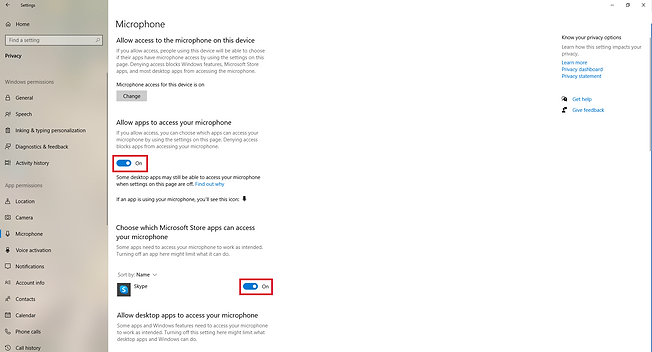
The incomming sound (Microphone) of my Voip channel isn't working, how can I solve this?
Microsoft is changing the Privacy settings to prevent for hacking in to the Microphone sound and listen to what you are saying.
Check these settings:
FAQ's (Frequently Asked Questions)
Microphone inputs / outputs
How can I connect my mixer with Insert to a effects unit?
See this picture below:

FAQ's (Frequently Asked Questions)
On Air, fader start, GPO
How can I connect my Mika-arm to my mixing desk?
How to connection is the same as for our Airlite unit.
See this picture below:

How can I connect my On-Air light to my mixing desk?
How to connection is the same as for our Airlite unit.
See this picture below:

FAQ's (Frequently Asked Questions)
Troubleshooting & instructions
D&R firmware update tool message AtLibUsbDfu.dll not found!
USB codec channel configuration.
I have technical problems with my Webstation and like to send it for check / repair. What to do?
How to send a device for repair to D&R:
INSTRUCTIONS FOR SHIPMENT INSIDE THE EUROPEAN UNION
If you want to send equipment to us from a country within the European Union, sending the equipment by normal Post or a courier service is sufficient.
Please note that the equipment is well and securely packed and that metal parts are not in direct contact with the carton that holds the equipment.
In addition, it is very important for our engineers and internal administration to provide a description of the faults in the equipment.
Please send us all contact information, such as serisal number, name, return address, email and telephone number.
With this information we can send you a message by e-mail upon arrival of the device that it has been received in good condition or inform you if damage has occurred during transport.
In that case we always take pictures and add the info to the repair form that you will receive from us per email as proof of arrival.
EXTRA INSTRUCTIONS FOR GOODS FROM OUTSIDE THE EUROPEAN UNION
The send Invoice that needs to be with the shipment in and outside the carton should contain the following info
1. Name and address of the sender
2. Temporary export/import for the purpose of repair (as Text on the invoice)
3. Date of transport
4. Name of the carrier
5. Tracking Number to D&R
6. Value of the equipment equal to the actual retail price. (if too low fraud is suspected)
If the device is returned after repair, the date of transport, the name of the carrier and the tracking number of the shipment to D&R will also be stated on the return invoice, so customs can always check that the device has actually left the country where it was repaired.
This is important information to avoid additional import costs and taxes on your side.
These are the most important things to consider when sending equipment to D&R for repair.
If there are still questions left, please contact us any time and we will help you.
You can also contact D&R to to let us arrange the transport for you. In that matter we will invoice you these shipping cost on the moment that the unit will be ready for return shipment.
If you are located outside the borders of the EU, this option is recommended by D&R.
Thank you
D&R incoming goods and technical support.
Repair shipping address:
D&R Electronica BV
Rijnkade 15-b
NL-1382 GS, Weesp
The Netherlands
Attn.: Incoming goods / Repair
I have technical problems with my Webstation and like to get support. What to do?
If you like to have technical support due an issue with your broadcast mixer, you can always fill in our support form to have direct contact with our engineers.
On workdays you will receive a first reply on your mail within 4 hours.
You can find here the link to fill in the support form for all needed information: SUPPORT FORM

Play-out software that works with Webstation

Aircast

Aeron Studio

Station Play List

Enco

Mairlist

Myriad

Proppfrexx

PowerStudio

Omniplayer

Caliope

Zara Studio

PlayIt

RadioDJ